Octagonal Greenhouse: 15 Steps (with Pictures)
A small octagonal greenhouse is more than just a garden structure. It is a charming, space-saving, and highly practical way to grow plants in a controlled environment while adding visual appeal to your yard. Unlike a standard rectangular greenhouse, an octagonal design gives you a unique architectural look, better light distribution, and a cozy footprint that works well in smaller gardens. Whether you want to start seedlings earlier in the season, protect delicate plants from harsh weather, or create a peaceful space for gardening all year long, a small octagonal greenhouse can be one of the best investments you make for your outdoor space.
Many gardeners love octagonal greenhouses because they feel elegant without being overly large or complicated. Their shape allows sunlight to enter from multiple angles, which can help plants receive more even light throughout the day. That makes them ideal for herbs, flowers, vegetables, and ornamental plants. They also create a beautiful focal point in the garden, often becoming the most admired part of the backyard. If you have been thinking about building one, this guide will walk you through the process in a clear and practical way.
Below, you will find 15 detailed steps for planning, building, and finishing a small octagonal greenhouse. Each step is explained in paragraph form to keep the process easy to follow, and each stage is written so you can imagine where a picture would fit naturally. If you are creating a blog post, you can place your own images after each step to make the article even more helpful and engaging for readers.
Step 1: Choose the Right Location for Your Small Octagonal Greenhouse

The first step is selecting the perfect spot in your yard. A greenhouse works best when it receives plenty of sunlight, so choose an area with at least six hours of direct sun each day. Morning sun is especially valuable because it warms the greenhouse early and helps prevent excess moisture from lingering on the plants. Try to avoid placing the structure under heavy tree cover, near tall walls that cast large shadows, or in low areas where water tends to collect after rain. A level or slightly raised area is ideal because it makes construction easier and helps with drainage.
A small octagonal greenhouse should also be placed in a location that is easy for you to access every day. Since you will likely be watering plants, checking temperature, and carrying supplies in and out, convenience matters just as much as sunlight. Think about proximity to a water source, your garden tools, and the main path through your yard. A well-chosen site saves time and reduces frustration later.
Picture idea: a backyard layout showing the selected greenhouse location with sunlight arrows.
Step 2: Decide the Size and Layout
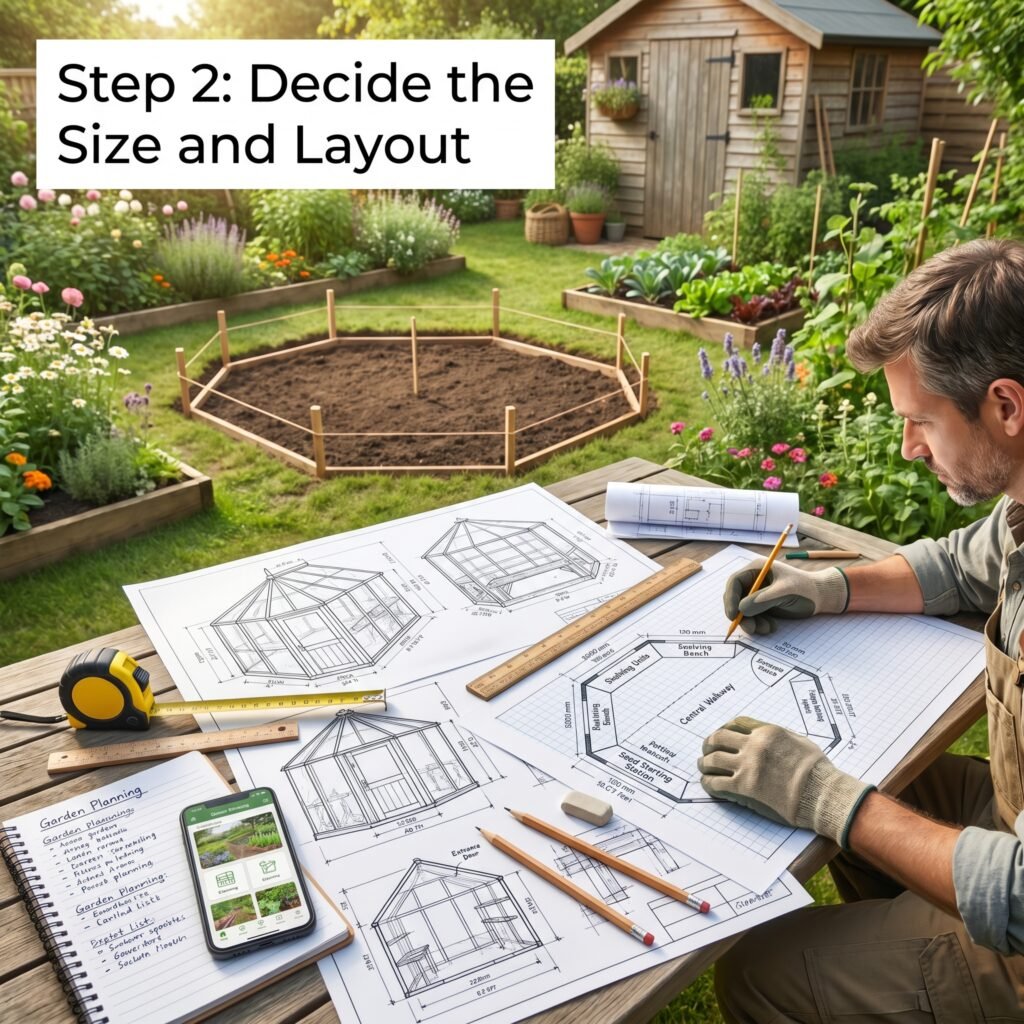
Once the location is chosen, you need to decide how big your greenhouse should be. Since this guide focuses on a small octagonal greenhouse, the footprint should be compact but still functional. The exact size depends on what you want to grow and how much space you have available. If you only need room for seedlings, pots, and a small workbench, a modest design may be enough. If you want to grow taller plants or create a mini garden room, you may want slightly more interior space.
The octagonal shape is useful because it gives you more usable wall area than many people expect. You can place shelving along the sides, hang baskets, and keep the center open for movement. It helps to sketch a simple floor plan before starting construction. Mark where the door will go, where shelves will be placed, and how much room you need for walking. This planning stage prevents the greenhouse from feeling cramped after it is finished.
Picture idea: a top-down sketch of the octagonal floor plan with shelf placement.
Step 3: Gather Your Tools and Materials
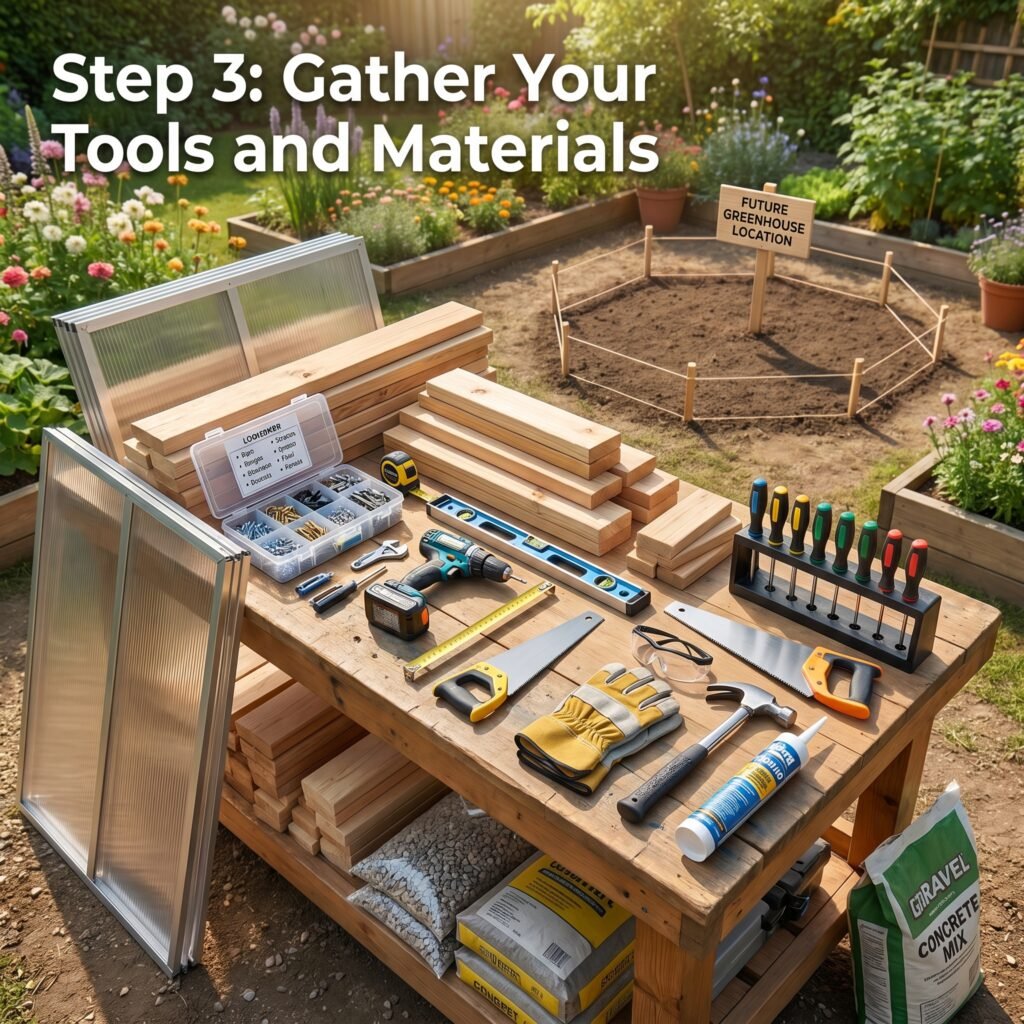
A successful project begins with the right materials. For a small octagonal greenhouse, you may need lumber or metal framing, screws, anchors, a clear roofing material such as polycarbonate panels or greenhouse-grade plastic, hinges, a door kit, sealant, and basic foundation supplies. The exact list depends on your design, but it is always best to gather everything before you begin. Running out of materials halfway through the build can slow progress and affect the final result.
You will also need tools such as a measuring tape, level, saw, drill, screwdriver, safety glasses, gloves, and possibly a hammer or impact driver. If your design includes a raised base or foundation, you may also need concrete blocks, pavers, gravel, or treated wood for support. Taking time to organize these materials before construction makes the entire project smoother and more enjoyable.
Picture idea: a flat lay of tools and materials arranged neatly before construction.
Step 4: Prepare the Ground
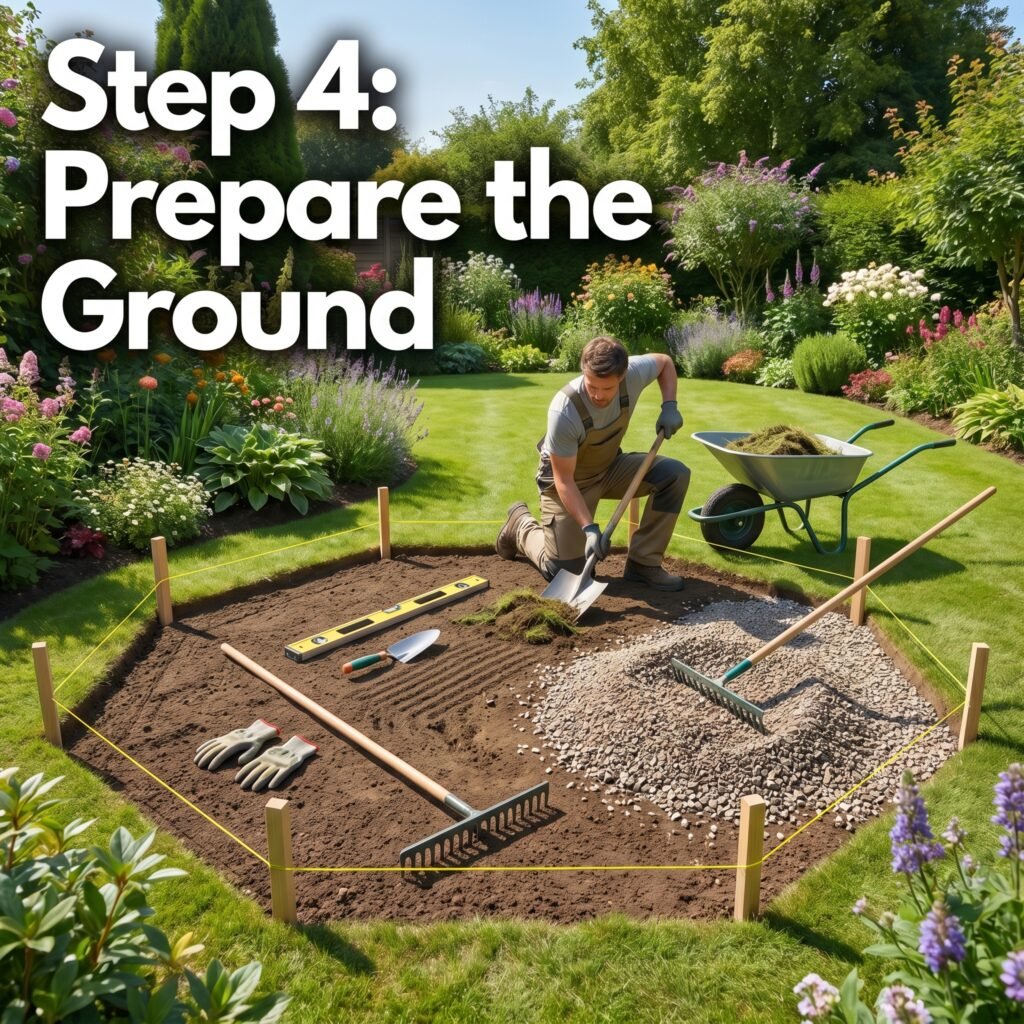
Before you build the frame, the ground must be properly prepared. Clear away grass, weeds, rocks, roots, and debris from the chosen site. Then level the area as much as possible so that the greenhouse sits evenly. A stable base is important because an uneven foundation can cause doors to stick, panels to shift, and water to pool in the wrong places. If the soil is soft or soggy, consider adding a layer of gravel to improve drainage and stability.
This is also a good time to mark the greenhouse outline on the ground. Use stakes and string or spray paint to visualize the octagonal shape. Once you see the footprint in place, it becomes easier to make final adjustments before any permanent work begins. A clean, level site is one of the most important foundations for a durable small octagonal greenhouse.
Picture idea: ground preparation with a marked octagonal outline and leveled soil.
Step 5: Build a Strong Foundation

A greenhouse needs a foundation that keeps it stable and secure. For a small octagonal greenhouse, the foundation can be made from treated lumber, concrete blocks, pavers, or another durable base depending on your design and budget. The key is to create a structure that can support the frame evenly and resist shifting over time. Even though the greenhouse is small, the octagonal shape requires precision so that every side lines up correctly.
Measure carefully and double-check the angles as you build the base. If the foundation is off by even a small amount, the frame may not fit properly later. The foundation should be level, square to the design, and firmly anchored to the ground. Once this step is done correctly, the rest of the build becomes much easier and more reliable.
Picture idea: a completed octagonal foundation frame on the ground before the walls are added.
Step 6: Assemble the Octagonal Base Frame
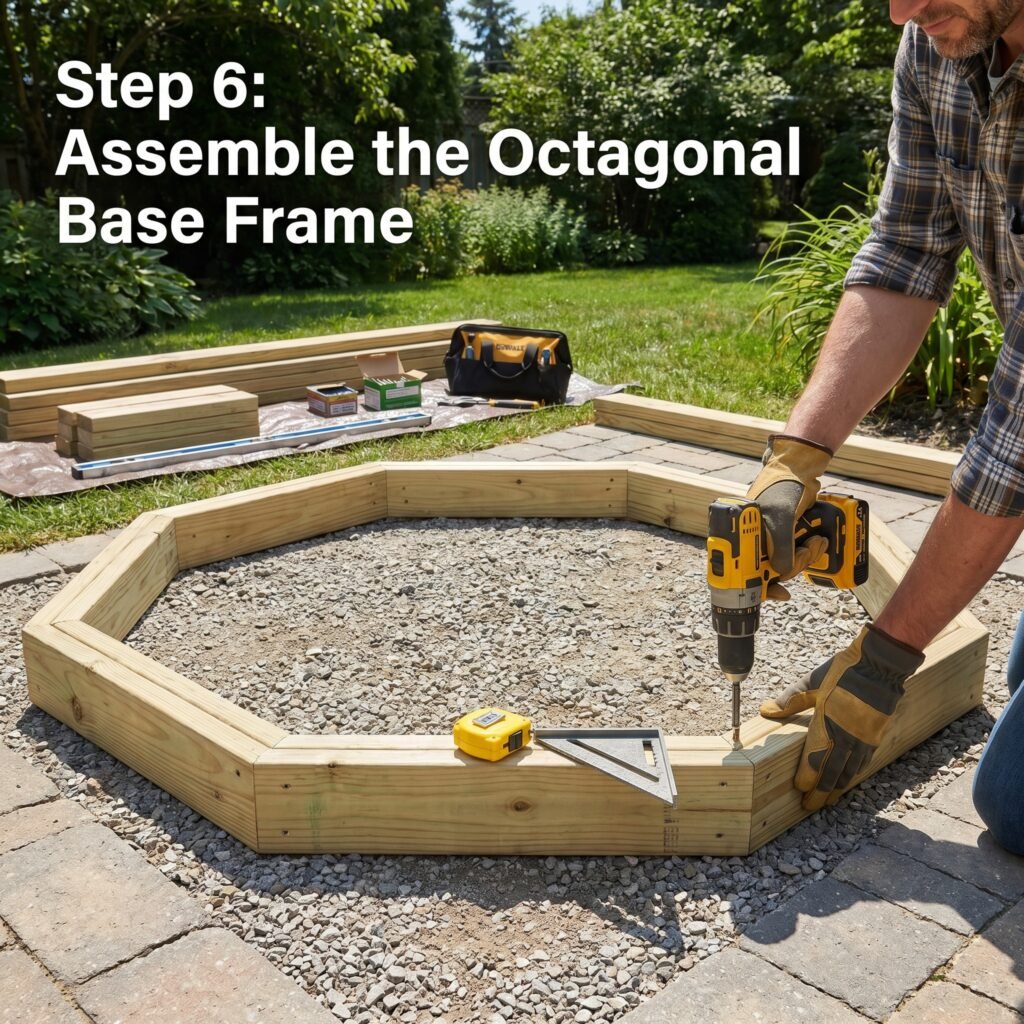
Now the greenhouse begins to take shape. Using your foundation as a guide, assemble the bottom frame in the octagonal form. This frame supports the walls and helps define the shape of the greenhouse. Because the structure is octagonal, each side must connect at the correct angle to create a balanced shape. Accurate measuring here will save you time and prevent fitting issues later on.
When assembling the base frame, make sure every joint is secure. Use corrosion-resistant screws or fasteners if possible, especially if your greenhouse will be exposed to moisture. It is worth taking your time during this step because the base frame carries much of the structure’s weight. A strong frame creates a stable greenhouse that can handle wind, weather, and daily use with confidence.
Picture idea: the octagonal floor frame assembled and checked with a level.
Step 7: Install the Corner Supports and Wall Posts
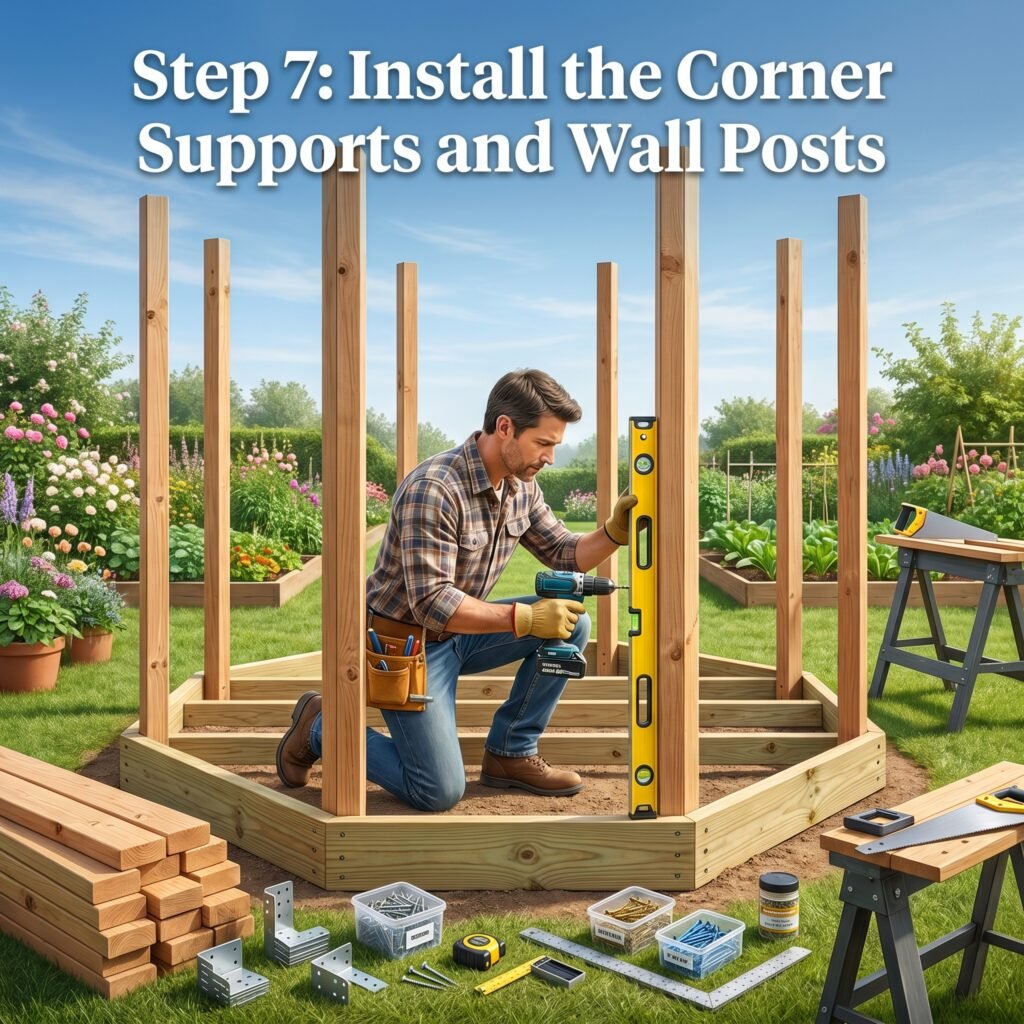
After the base frame is in place, attach the vertical supports or wall posts at each corner. These posts are the skeleton of your greenhouse, so they must be positioned carefully and secured tightly. They should stand upright and align correctly with the octagonal layout. This step gives the structure height and creates the framework for the walls and roof.
It is important to check each support with a level before moving to the next one. If one post leans too far in or out, it can distort the greenhouse shape and affect the roof installation later. Strong vertical supports help your small octagonal greenhouse stay durable and attractive for years. This stage is where the project starts to look like a real greenhouse instead of a simple platform.
Picture idea: upright corner posts attached to the octagonal base.
Step 8: Frame the Door Opening
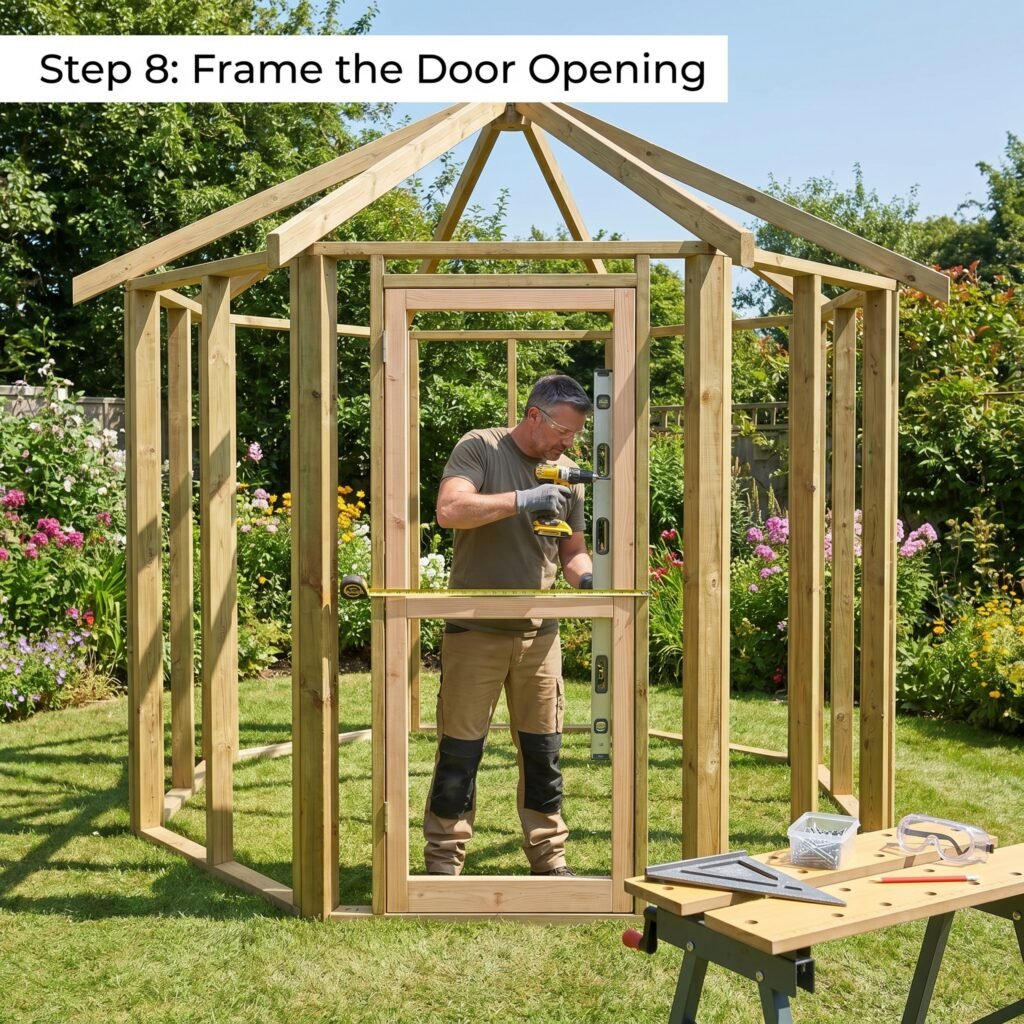
Every greenhouse needs a practical entrance, and this is the right stage to create it. The door opening should be wide enough for you to carry trays, watering cans, and garden supplies in and out comfortably. Depending on your chosen design, the door can be centered on one side of the octagon or placed in a way that best suits your yard layout. Some gardeners even prefer a double-door look for added convenience and style.
As you frame the opening, make sure the structure around it is strong enough to support the door hardware. A good greenhouse door should open smoothly, close securely, and help preserve temperature inside. If your greenhouse is in a windy area, a solid latch system will also be useful. A well-planned entrance improves both function and appearance, making the greenhouse easier to use every day.
Picture idea: framed door opening with temporary supports around it.
Step 9: Build the Roof Structure
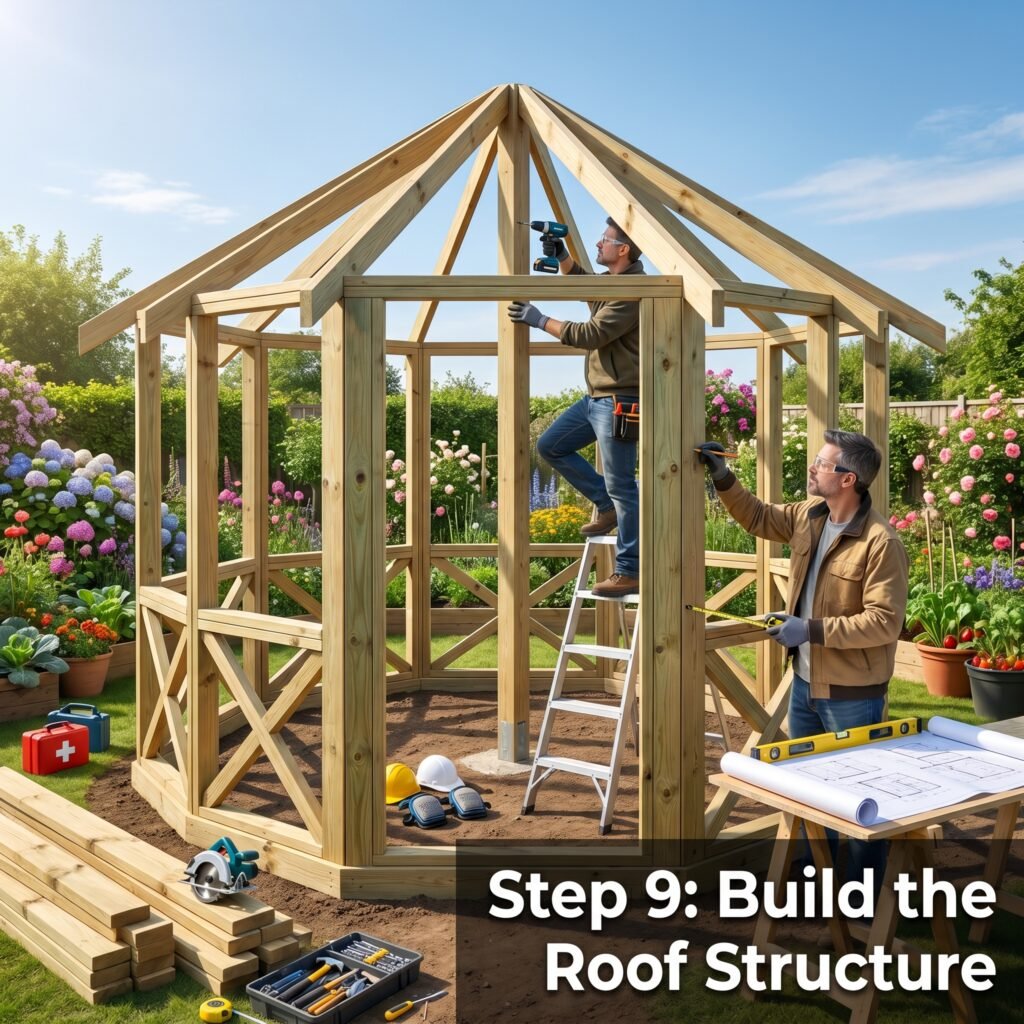
The roof is one of the most important parts of the greenhouse because it controls light, airflow, and rain protection. In a small octagonal greenhouse, the roof often has a peaked, conical, or faceted design that complements the shape of the base. Build the roof frame carefully, making sure the angles align properly so the structure is balanced and strong. The roof must be able to carry the weight of panels while also shedding rain efficiently.
This is the stage where your greenhouse really begins to stand out visually. The roof shape gives the octagonal design its character and charm. It also affects how much air moves through the greenhouse and how well sunlight reaches the plants. A well-built roof frame sets the tone for the entire structure and prepares it for glazing or panel installation.
Picture idea: roof rafters assembled on top of the wall frame.
Step 10: Add the Glazing or Panel Material
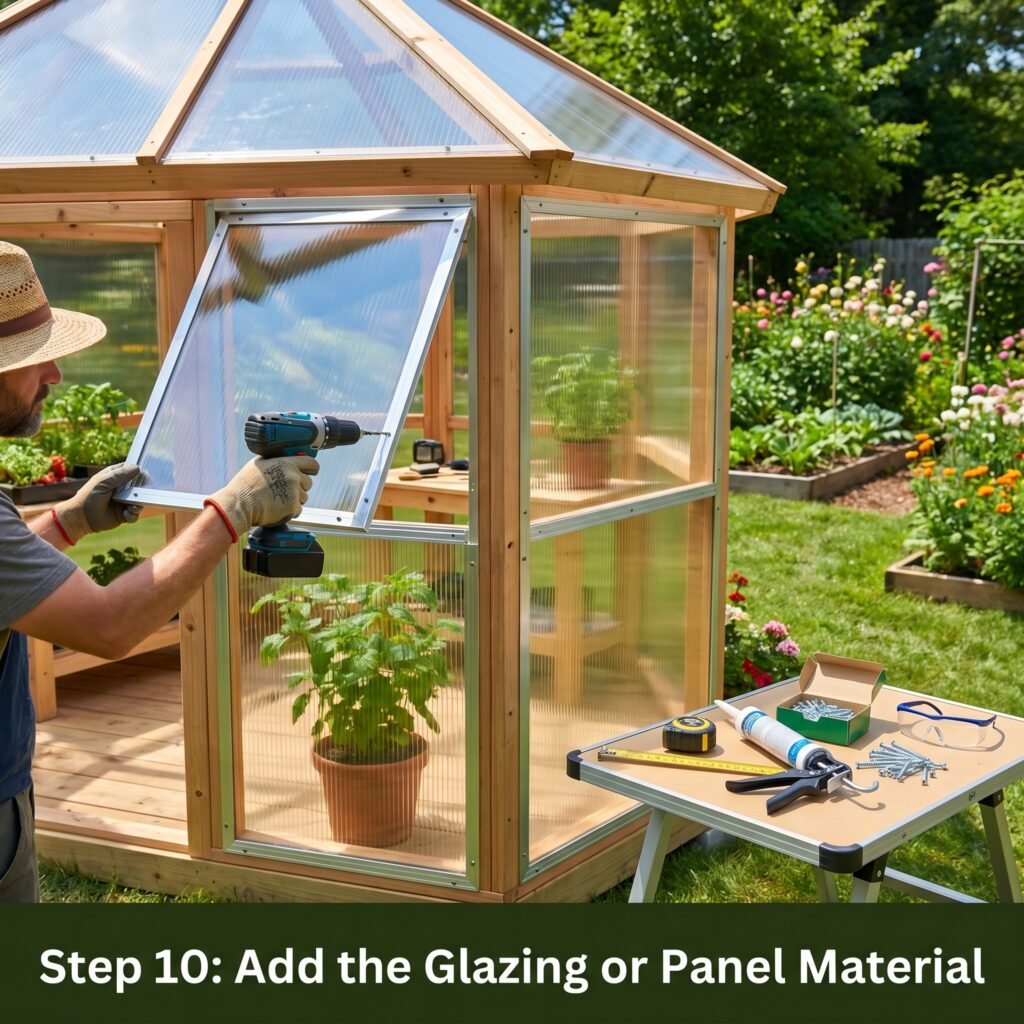
With the frame complete, it is time to enclose the greenhouse. You can use polycarbonate panels, greenhouse plastic, or another transparent material designed for outdoor use. Polycarbonate is popular because it is lightweight, durable, and helps diffuse sunlight gently across the interior. Whatever material you choose, make sure it is cut and installed carefully so that the greenhouse stays weather-resistant.
Attach the panels securely to the frame, sealing gaps where needed to keep out drafts and moisture. Good glazing helps maintain a stable growing environment and improves the overall appearance of the greenhouse. Since this is a small octagonal greenhouse, the transparent panels will also make the structure feel open and bright from the outside, adding to its charm in the garden.
Picture idea: transparent wall and roof panels being installed on the frame.
Step 11: Install Ventilation Features
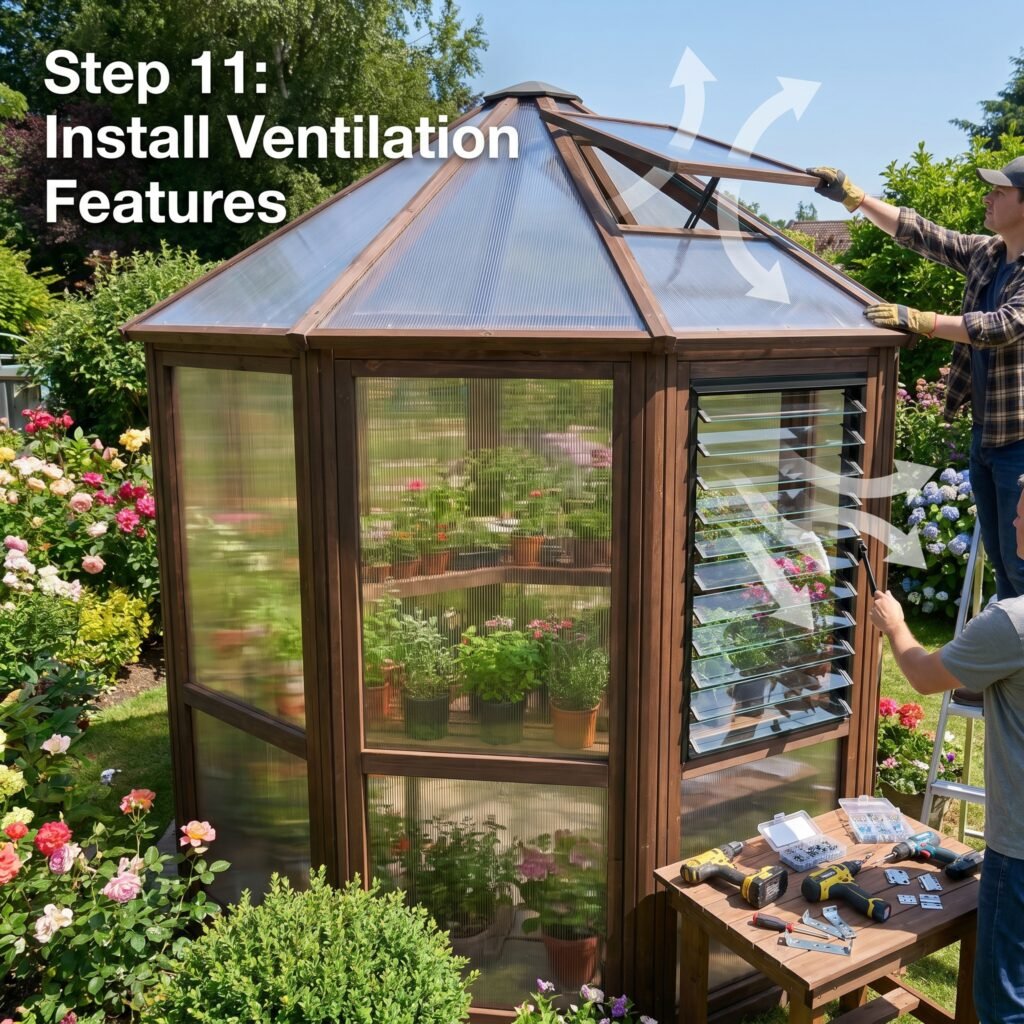
Ventilation is essential for healthy plant growth. Without enough airflow, temperatures can rise too high, humidity can build up, and disease can spread more easily. Add windows, roof vents, louvered openings, or small fans if needed to help regulate the climate inside your greenhouse. In a small structure, even one or two well-placed vents can make a big difference.
Think about how air will move through the space during hot days and cool nights. The best greenhouse design balances warmth with circulation, allowing plants to breathe while still staying protected. Ventilation is especially important in a compact octagonal structure because smaller spaces can heat up quickly. Good airflow makes the greenhouse more comfortable for both plants and gardeners.
Picture idea: roof vent or side window open for airflow.
Step 12: Seal the Structure and Check for Gaps
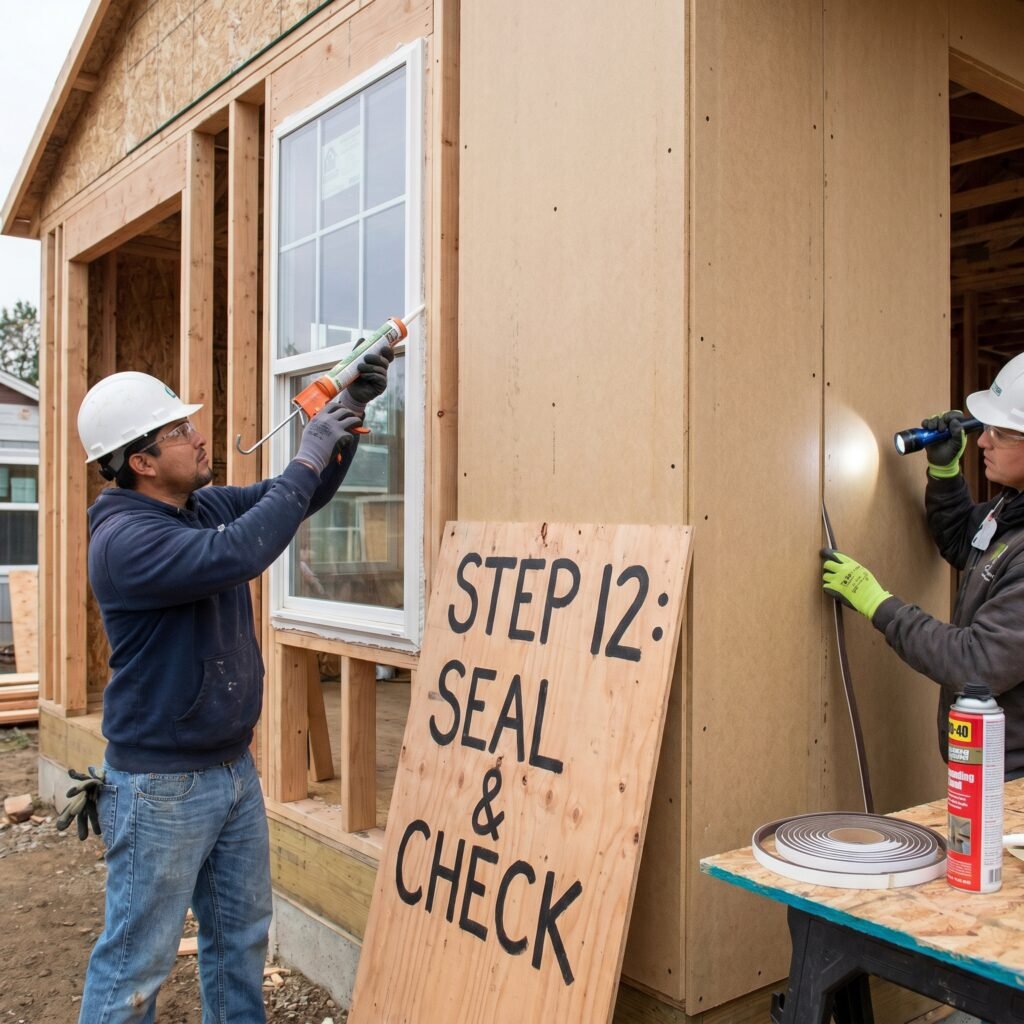
Once the main structure is finished, inspect every seam, corner, and connection point. Look for gaps where air, rain, or insects could get inside. Use weatherproof sealant where needed to improve insulation and protect the structure from the elements. This step may seem small, but it plays a major role in keeping the greenhouse efficient and long-lasting.
Take your time walking around the greenhouse from the outside and inside. Check the joints between panels, the base connection, the roof edges, and the door frame. A well-sealed greenhouse keeps temperature more stable and reduces maintenance later. For a small octagonal greenhouse, proper sealing also helps preserve the neat, polished look of the finished build.
Picture idea: close-up of sealant being applied along a panel edge.
Step 13: Add Shelves, Benches, and Hanging Space
After the greenhouse shell is complete, you can make the interior more useful. Add shelves along the walls for pots, seed trays, tools, and small containers. A narrow bench or potting table can also make planting and repotting much easier. Since the octagonal shape gives you several wall sections, you can organize the interior in a way that feels both efficient and attractive.
Try not to overcrowd the center of the greenhouse. Leaving enough open space will make it easier to move around and care for plants. Hanging space is also valuable, especially for baskets or lightweight tools. Interior organization turns a simple greenhouse into a productive and enjoyable workspace that supports your gardening goals.
Picture idea: organized interior with shelves, pots, and a small workbench.
Step 14: Set Up the Growing Environment
Now that the structure is complete, focus on creating the best environment for your plants. Place thermometers, humidity monitors, watering tools, and plant trays in positions that make daily care easy. Add a water source or watering can station if possible. If your climate changes quickly, you may also want to use shade cloth, a heater, or a small fan to maintain a stable environment.
The beauty of a small octagonal greenhouse is that it can become a controlled growing space tailored to your needs. You can use it for spring seedlings, summer vegetables, winter protection, or year-round herbs. The more carefully you set up the environment, the more successful your plants will be. A greenhouse is not just a structure; it is a living system that supports healthy growth.
Picture idea: finished greenhouse interior with seedlings, labels, and climate tools.
Step 15: Decorate, Maintain, and Enjoy It

The final step is to make your greenhouse a space you truly enjoy. Add decorative touches like painted trim, labels, plant markers, or a small stepping-stone path leading to the door. You might also include a chair, a watering station, or even soft lighting for evening use. A beautiful greenhouse is more inviting, which means you are more likely to use it often and care for it well.
Maintenance is just as important as decoration. Clean the panels regularly so sunlight can enter freely, inspect the frame for wear, and keep the interior tidy. Remove dead leaves, monitor moisture, and check vents and doors to make sure everything is working properly. The more attention you give your greenhouse, the more rewarding it will become. A well-maintained small octagonal greenhouse can bring joy, productivity, and visual beauty to your garden for years.
Picture idea: finished greenhouse with decorative touches and a peaceful garden setting.
A small octagonal greenhouse offers the perfect blend of beauty, function, and smart space use. It is ideal for gardeners who want something practical but still distinctive. The octagonal shape feels special, the compact design works in smaller yards, and the controlled environment helps plants thrive. Whether you build it yourself or use this guide to plan a future project, the process can be incredibly satisfying from start to finish.
If you are ready to transform your garden, a small octagonal greenhouse is a wonderful place to begin. It can become your seed-starting station, your year-round plant shelter, your quiet retreat, and one of the most admired features in your outdoor space. Start with the right location, build carefully, and keep improving it over time. The result will be a greenhouse that is both useful and beautiful, and one that adds lasting value to your home and gardening life.